Gmail is probably one of the most popular free email services out there, yet it is somehow not very convenient and user-friendly. At least once you open it and view its default Gmail layout.
Many businesses and individuals use Gmail for professional, educational, and personal purposes. Therefore, it is crucial that the Gmail inbox is optimized, so that you are not constantly wasting time looking for emails and trying to figure out what’s going on.
Your Gmail inbox does not have to be a mess, and we’ll show you how you can change that quickly and with little effort.
And for more organizational tips, check out the guide on organizing your home office and tips for organizing books.
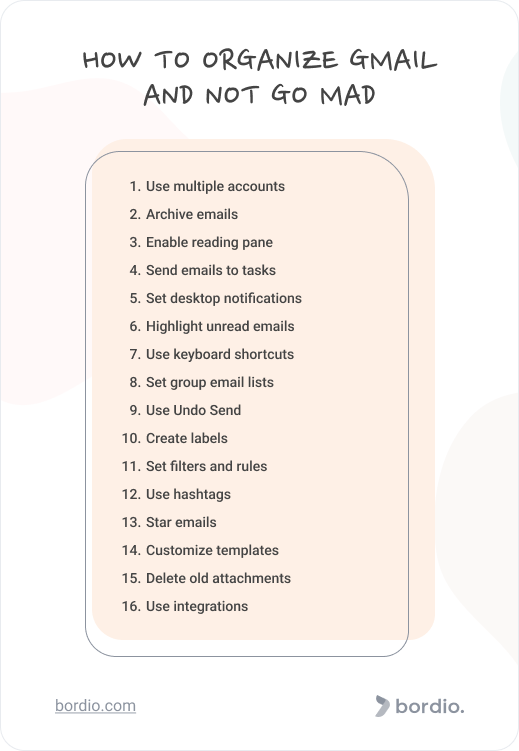
Organizing tips for Gmail
Take a few steps to organize Gmail inbox with our tips, and you won’t miss important messages or forget to respond to them ever again.
Multiple Gmail accounts
First and foremost, there is no need for you to keep all your emails in a single Gmail account. This Google service is free, and you can have an unlimited number of email addresses created, so why not use it?
Not only is it convenient to separate work and personal, or work and education-related emails, but it is also safer. Imagine if something happens to your one and only Gmail account that has your entire life in there. That wouldn’t be pleasant. Having multiple accounts reduces that risk, plus you can use them to cross-verify odd logins and use them as backups.
Gmail allows you to view all multiple inboxes from all email addresses in a single folder, so you won’t miss out on any important emails coming through. To use this feature, go to Settings and Choose Multiple Inboxes next to the “Inbox type”.
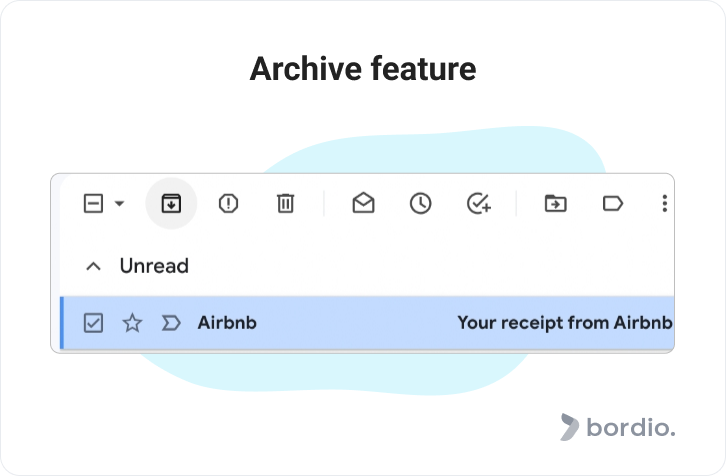
Archiving feature
Gmails’ free storage space is pretty generous, so you don’t have to delete old emails to keep on using the service.
Instead, you can archive messages and only delete spam and advertisements. You might end up needing data from old emails in a few years, you never know. And if that happens, you’ll be glad that you’ve simply archived them.
To archive an email message, select it and click the archive button that looks like an icon with the arrow facing down on the top bar menu.
And if you want to take archiving one step further, set a rule to automatically archive certain types of emails. To do that, go to Settings – Filters and blocked addresses – Create a new filter.
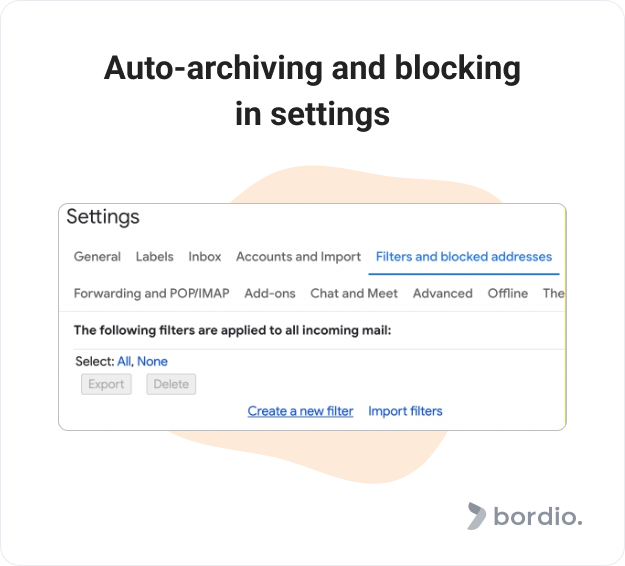
Fill out the parameters of your choice in just a few clicks and save. Once that is done, you will no longer be distracted by emails you don’t have to read but don’t want to delete either, such as various receipts.
Archiving emails is completely hassle-free because archived emails are easily searchable in the Gmail search box. Simply use the search bar to find any emails you’ve previously archived if you need them.
Reading pane
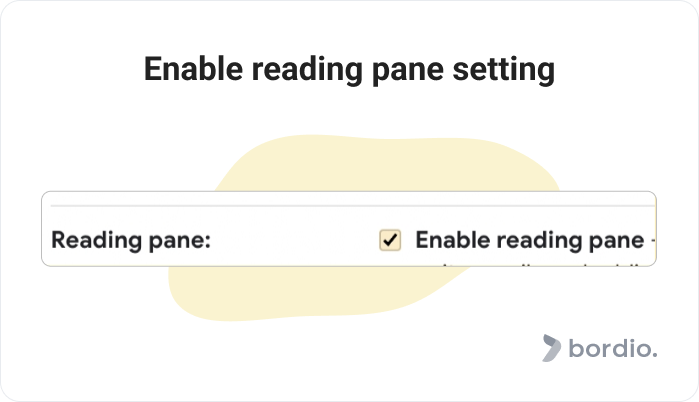
Click on the cog-shaped settings icon, select Inbox, find the Reading Pane section, and click “Enable reading pane”.
The reading pane in the Gmail inbox allows users to read their emails and have a standard inbox view on the same screen. Many say it helps them read and reply to their emails faster.
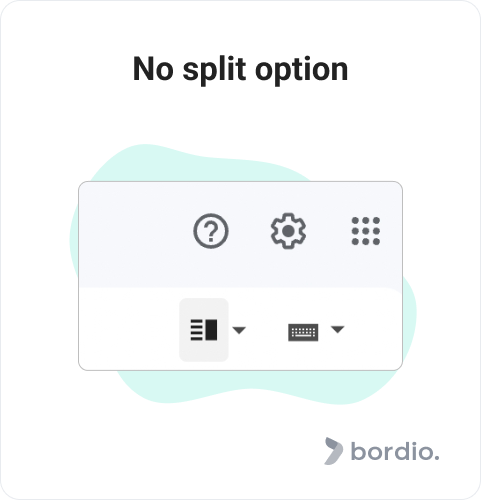
Google mail allows you to choose between three options for locating the reading pane – no split, right of inbox, or below inbox. No split means that you won’t have to view the reading pane all the time, but you can add it on demand.
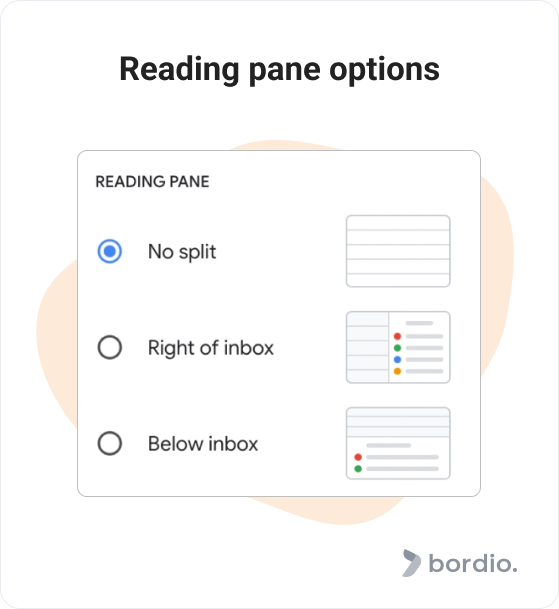
If you choose the “No split” option, you will have a new icon in the upper right corner that will enable you to make the switch between standard and reading pane views.
Emails to tasks
With Gmail, you can add emails to Google Task and schedule to deal with them later.
To do that, select an email and click on the upper menu bar icon that looks like a check with a plus. That way, you won’t forget to reply to this important email later and won’t have to keep it unread in your Gmail inbox.
![]()
Tip: As a Bordio’s weekly planner user, you too are able to create tasks from emails. Simply click “Forward” for the incoming email, and it will be sent to the Waiting List, so you can schedule and process it later. Bordio’s top project management tools will help you with organization.
Desktop notifications
One of the main obstacles to productivity is distractions.
People get distracted for many reasons, and one of the common patterns is to constantly go back to your Gmail inbox to see if there’s something new in there.
Needless to say, it is not the best way to spend your time, and it most certainly does not help complete the tasks and feel accomplished.
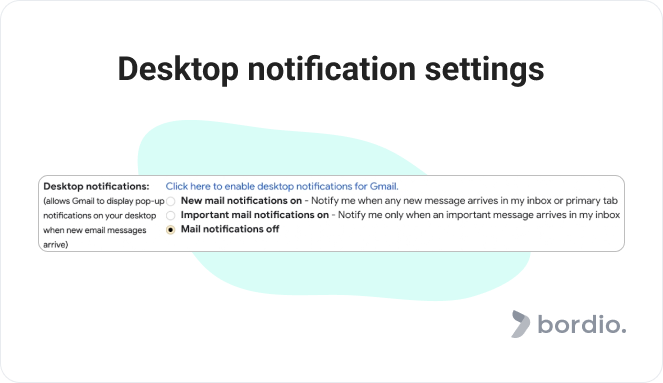
An easy change in settings can eliminate this problem. Simply go to Settings – Desktop notifications, and activate them.
And that’s it!
From now on, even if you’ve switched from the Gmail tab and are now working on something else, you will get notifications about new emails in the lower right corner of the screen.
While this feature helps you stay on top of all emails that come through to you, unless you work in customer service, it can do more harm than good.
So if you’re worried about the constant flow of low-priority emails that disrupt your focus, select the “Important mail notifications on” to only get the emails that matter. The algorithm is not perfect, but it will do the job nine times out of ten.
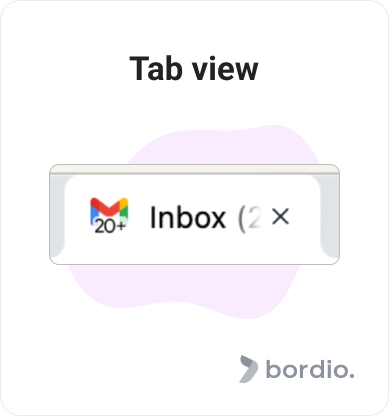
Tip: If email notifications are out of the question for you, but you still want to stay in control, go to General settings, then choose Advanced, and scroll all the way down to the Unread message icon:
![]()
Once enabled, it will show how many unread emails you have right over the Gmail logo in your browser.
Neat, right?
Just like that, you can stay in the know and not worry about intrusive notifications constantly coming through.
Highlighting unread emails
Go to Settings – Inbox – Inbox type. Then choose – Unread first.
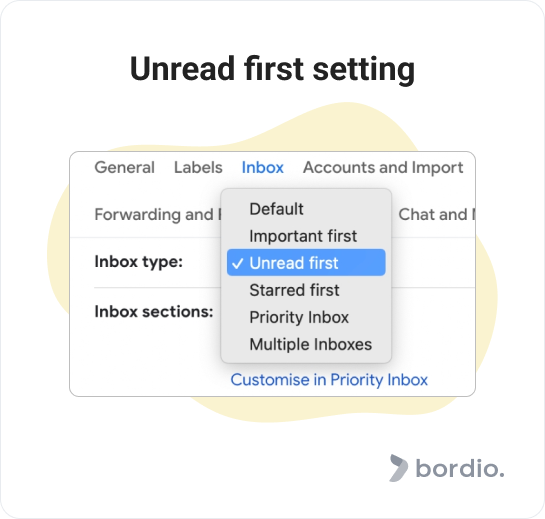
With that, all your unread messages will be showing on top of the mailbox, so you won’t have to scroll through pages of read emails to find the ones that are yet to be opened and answered.
Alternatively, try the Priority inbox feature by Gmail that will analyze what emails are more important than others and put them on top of the Gmail inbox tab.
Inbox view
In addition to filtering what emails show up first in your mailbox, you can also adjust your inbox layout by choosing how much detail you can see for each email.
To do that, click on the Settings icon (cog) and select one of the three options:
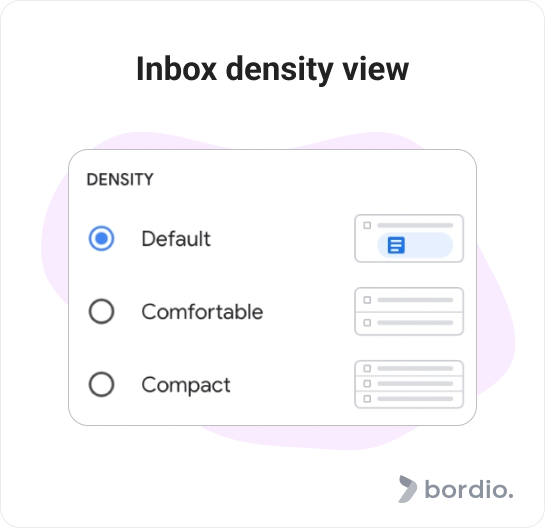
The Default view shows the name, the subject, and the attachments’ file type. With Default, you can open attachments without opening the actual email which can be very convenient.
The Comfortable view lets you see that there’s an attachment with an icon, but you can’t open attachments without simultaneously opening the email.
The Compact view allows you to see more emails per page by compressing them closer to one another.
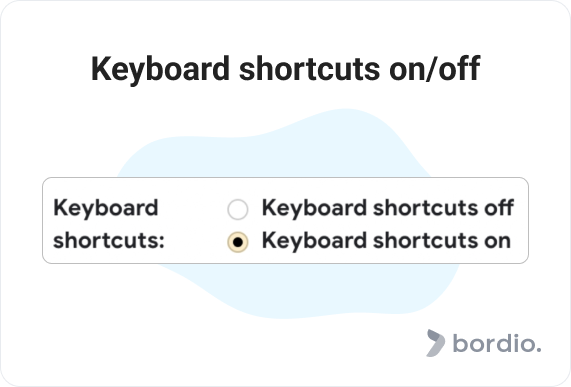
Keyboard shortcuts
We’ve already praised shortcuts in the Google Calendar tips article. Gmail has them too.
Shortcuts seem to be a minor improvement but all those seconds you spend on typing something out add up quickly. To active keyboard shortcuts, go to General settings and enable them:
Google has a whole little guide (https://support.google.com/mail/answer/6594?hl=en-GB) on using Gmail’s shortcuts but the most common shortcuts are:
- Select conversation – x
- Archive – e
- Mute conversation – m
- Delete -#
- Reply – r
- Reply to all – a
- Forward – f
- Previous message in an open conversation – p
- Next message in an open conversation – n
- Report as spam – !
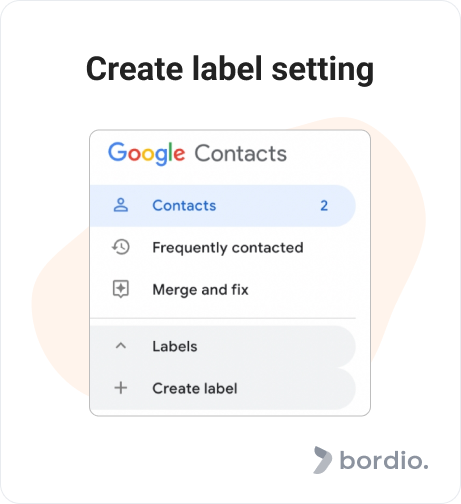
Group email lists
If you find yourself sending regular emails to the same group of people, create group email lists and avoid having to manually add email addresses every single time.
This is a great feature for project managers, especially those that manage multiple projects and send emails back and forth every day. It is also handy for students who work on group assignments with their classmates all semester long.
To create a group email list, go to Google Contacts, find “Labels” on the left menu, and click “Create label”.
Next, add contacts to the mail label and you’re all set.
Next time you need to send an email to that group of people, type the label name in the recipient section and it will be suggested by the system.
Undo Send
If you haven’t already, activate the “Undo send” button to save yourself from typo embarrassment or having to send the “Sorry, forgot attachment” follow-up emails.
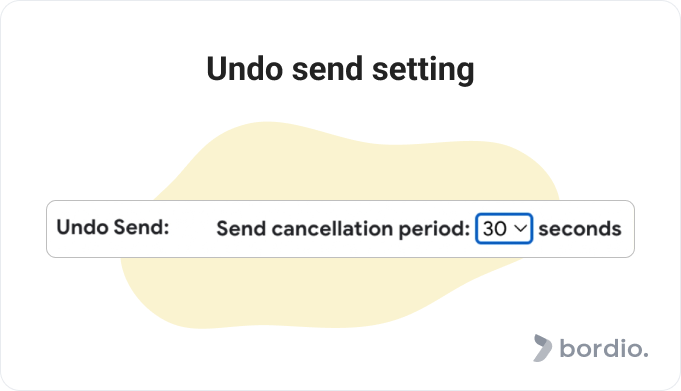
The feature allows a maximum of 30 seconds after the email was sent, but it’s often more than enough to realize that you’ve made a mistake and try to fix it.
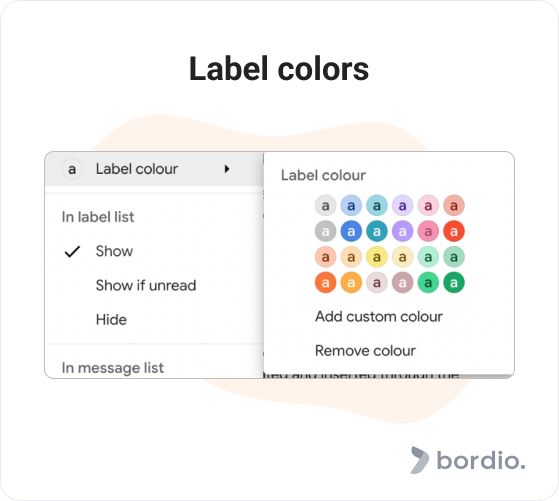
Labels
Use labels to organize your Gmail. Labels are essentially folders, and you can create labels to separate work, wedding-related, school or any other emails from the rest of your Gmail inbox.
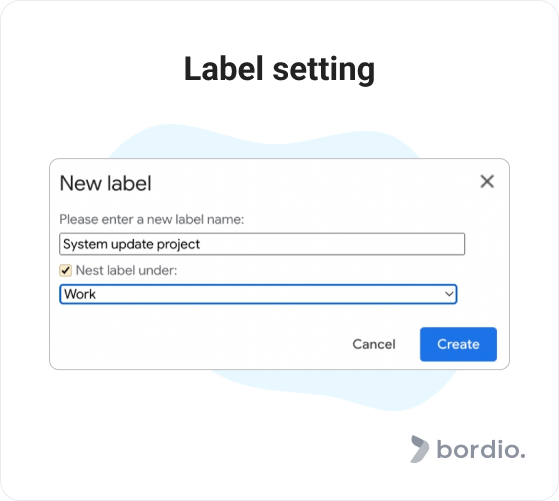
If you are a project manager with many roles and responsibilities, you can create sub-labels and nest them under the main “Work” label.
For example, you can create sub-labels for different projects or departments that you manage. That way, you’ll avoid the inbox clutter and will not be wasting time scrolling through your Gmail inbox over and over again in search of a specific email for this one project.
Also, don’t forget to add colors for the extra visualization.
Filters and rules
Besides labeling and archiving, you can also use filters to further structure and separate your emails.
First of all, you can create filters to automatically forward specific emails to a separate folder. For example, you can set this rule for email messages from a specific sender or a domain name. All filtered emails in Gmail will go to a specific folder that you can then assign the time to review.
Tip: If you have a lot of emails coming through that you don’t have to review right away, filter them out, and create a task in your digital to-do list to go through them all later. This is called task batching when you set aside time to go through similar tasks or perform similar activities. Task batching is great for productivity, as it allows you to get in the mood and power through them quicker and with better results. We recommend free weekly schedule planner and schedule daily planner – which should help you with organazing your emails.
It works because it takes us different mindsets and energy to deal with various tasks. For example, working on bugs in your new software is a very different job than having to call your client and discuss the next steps of the project. We have more handy productivity tips in our article, so make sure you check it out.
Additionally, you can use the filename:[file type] formula to create filter emails that contain specific media types. So, if you are a designer and get a lot of PDFs, you can have them all go into a single folder.
Filter idea: If you sometimes send emails to yourself, filter them to go to a separate too. That way, you’ll have all your notes, to-dos, and reminders in one place.
Hashtags
You can also filter your emails with the help of hashtags.
Simply add them to the body of the email and search them later. We recommend putting all hashtags at the end of the email so that it doesn’t distract or confuse the recipient.
Hashtag idea: Create a #NeverDelete hashtag to make sure you don’t accidentally purge emails that would be useful for you later on.
Starring emails
You can add stars to important emails and they will end up in a separate folder.
You can add and remove stars easily, so once something loses its priority (e.g. flight tickets confirmation) you can remove the star to keep this folder nice and clean.
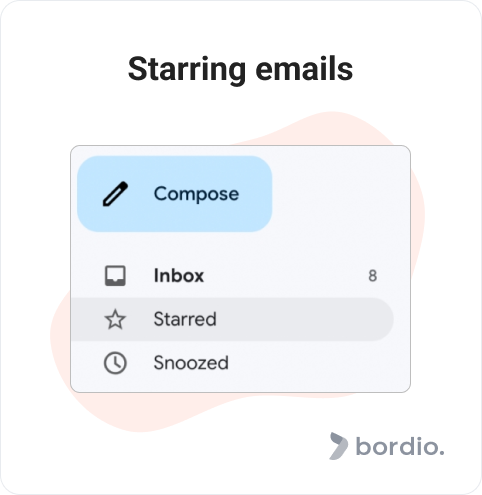
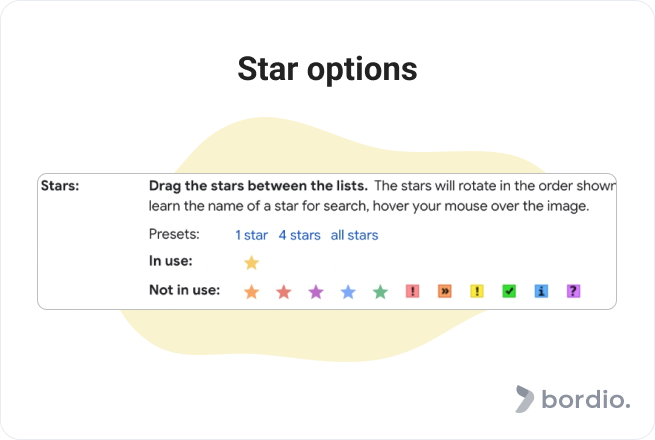
You can have the default yellow star for all important emails, or you can go advanced and use multiple star colors.
To do that, go to general settings and scroll down to the Stars section.
Templates
Not many people know that Gmail has email templates that you can create from scratch and customize as you please. Templates are great for saving time on lengthy emails, so we highly recommend them.
To enable Gmail templates, go to Advanced settings and find “Templates”.
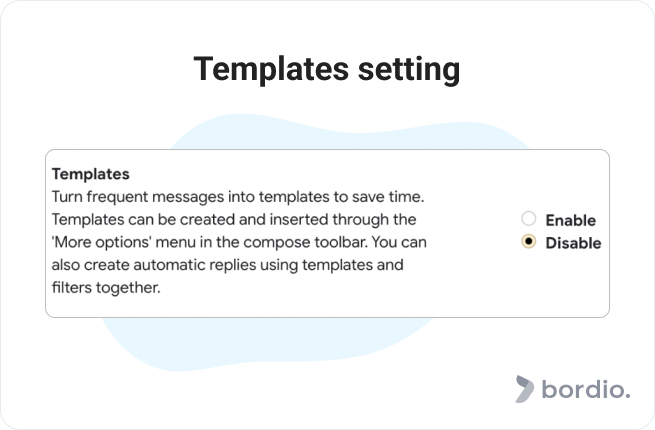
To create a template, simply write a new email in drafts and select “Save draft as a template”. Also, make sure you give your email templates custom names to make them easily recognizable.
Deleting old attachments
We’ve talked about archiving in this article, but if you come close to a limit of 15 free GB that Gmail offers to its users, you might just have to resort to deleting emails after all.
Going through your entire inbox, and deleting hundreds and thousands of random emails can be tiring, so to optimize your time, delete messages with old attachments as a start.
In Search, you can choose “Has attachment” and select a timeframe. You can also filter them out by size, so there are multiple options to spot those heavy emails that are taking up valuable space. Go through emails with attachments, and your overloaded inbox will already feel might lighter.
To make sure you never run into Gmail issues because you’re out of space, create recurring events in your online calendar planner, let’s say, every 3 months. Make these events 10-15 minutes and dedicate them to cleaning out your mailboxes. That would help you keep it in order, remove any sensitive data you don’t want hanging there, and do all that in a neat short time period. Bordio provides the best task trackers and calendar schedule makers for such tasks.
Integrations
If you feel like Gmail lacks certain functionality that you require, explore extensions and integrations.
For example, integrate Gmail with Bordio’s free day planner to streamline your team and project management. Together, they are a powerful duo that can take your projects and individual productivity to a next level.
Final thoughts on organizing Gmail
Emails are a necessary evil in our lives.
We can’t get away from them, no matter how much some of us would like that. However, dealing with emails and keeping your inbox clean does not have to be miserable.
With our Gmail organizing tips, you can make it bearable and even enjoyable.
And if you are interested in organizing and upgrading your life in general, go through our time management tips guide and the productivity tips guide.
Good luck!